-40%
FLOTit Floating Dip Tube | no ARM-in-KEG | no clog | no transfer | no bottling
$ 2.61
- Description
- Size Guide
Description
FL
Ô
T
it
floating dip tube
.
Created by the maker of
S
P
U
N
D
it
2.0
- the world's best spunding valve for pressure brewing!
Traditional fermenter keg has rigid dip to draw beer out from the bottom. So the first volume is always full of sediments of the yeast cake that could block/jam the poppet valve. So, you won't get clear beer until most the sediment is removed and a lot of beer wasted until then. Many brewers resort to cutting the dip tube short to avoid this problem. The beer below the dip tube is wasted.
A number of floating dip tubes (FDT) were created to solve this problem where, instead of rigid tube, they have flexible silicone tube with a float at the distal end so they draw from the top first. However, there are a number of shortcomings of their designs as described here:
Blind connection inside the keg
. Unless you are
not
using a corny keg, you have to stick your arm inside the keg to connect the silicone tubing to the short metal dip tube. This task is not only cumbersome but also prone to contaminating the interior of the keg.
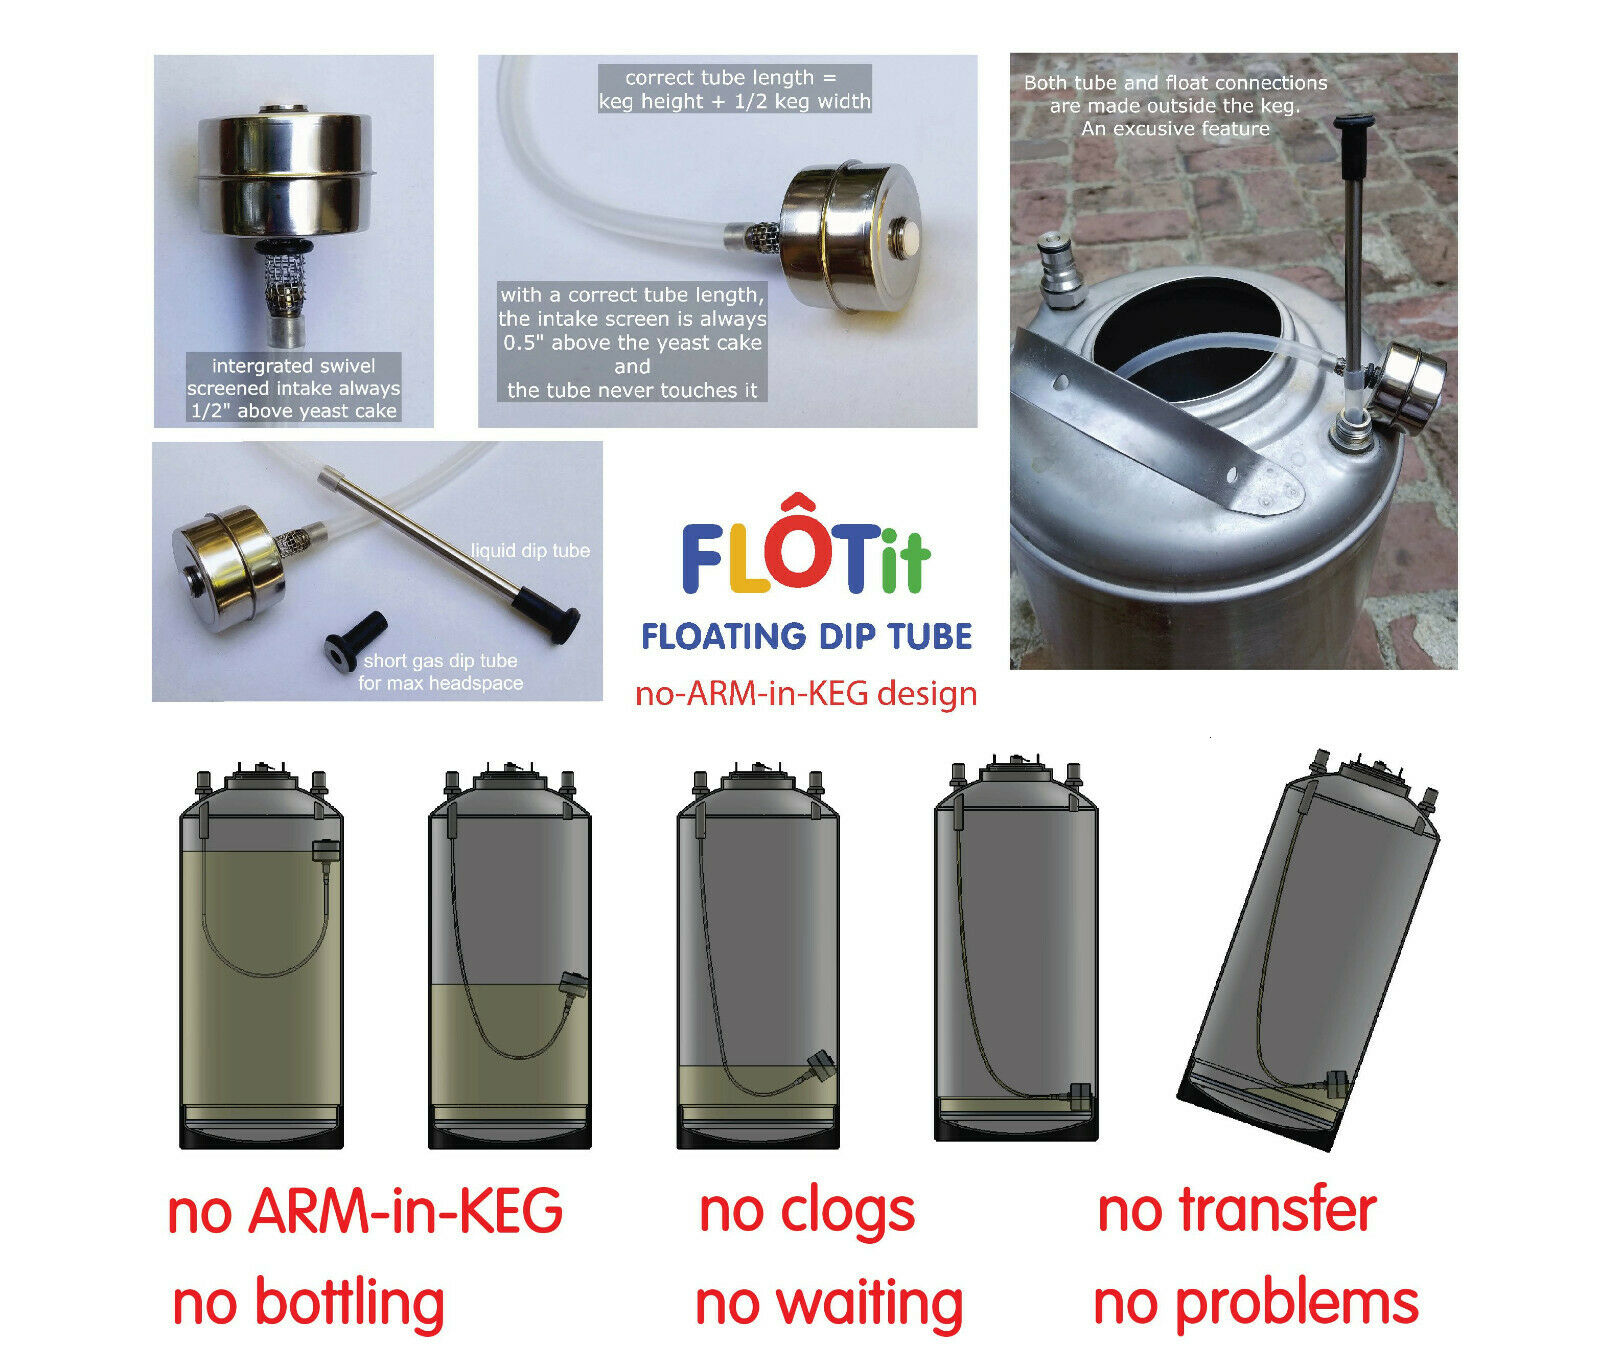
All connections of FLÔTit are made outside the keg - an exclusive feature!
Prone to clogging
. The floating end of the draw tube tend to embed into the yeast cake as the beer level gets low, sucking in sediments to clog the poppet valve. And since you can't see inside a keg, you don't know when the right time to stop drawing.
CBDS
design is good at keeping its draw inlet above the yeast cake, but it's and too big for small kegs such as PicoBrew kegs. The floats of
Fermentasaurus
,
Fermzilla
,
Keg Buoy
and
Top Draw
are really bad for this problem. The loosely attached intake tube always jams itself onto the yeast cake to suck up sediments, unless you have a clear fermenter to see and stop it the right time (
see photo
).
Cask Widge
is really designed for reducing sucking sediments of beer or wine casks - not fermenters loaded with yeast cake and trub at the bottom.
The screened intake of FLÔTit is ALWAYS 1/2" above the yeast cake.
Drooping tube stirring things up
. Unless the length of the silicone tube is properly sized for the keg or fermenter, at some level of beer, the lowest point of the drooping tube touches and stirs up the sediments to mess things up.
The silicone tube of FLÔTit never touches the yeast cake.
Unpredictable landing location
. All these FDTs are not designed to control the landing location of the float. So for stainless steel kegs (inside is not visible), you can’t tilt, pool and draw the last layer of beer.
FLÔTit is designed to land its float directly under the gas post. The keg can then be tilted toward the gas post to pool the last bit of clear beer to the float's intake.
Instruction for
F
L
Ô
T
it
The ideal overall length of FLÔTit tube (including the float) is determined by the keg’s shape & size. It should be the distance
from liquid post’s opening to the keg’s bottom + 75% of the keg’s diameter
(
see the tube's geometry in Fig. 1 above
). This length would keep the silicone tube from dragging on and stirring up the trub/sedimen. It helps keep the screened section of the float parallel with and 1/2" above the yeast cake when the keg is near empty. And it also keeps the float from “wandering” and coerces it to land at the opposite side of the liquid post (or under the gas post of Corny keg). To get most of beer out when the keg is near empty, just tip the keg toward the gas post so the most of the remain beer is pooled where the float is (under the gas post).
USEFUL TIP
: For typical kegs, just cut the silicone tube equal to the height of the keg + 2" (as a margin of error). Try it and cut back later if need be.
To install
F
L
Ô
T
it
:
1. Be sure to sanitize all the parts and your hands.
2. Connect an appropriate length of the 7mm OD silicone tube to the short stainless steel dip tube and insert it through the liquid nipple until the dip tube's O-ring is resting on the nipple.
Re-install the liquid post by fingers until it stops turning and then turn another 1/2 to 3/4 turn with a wrench. Over-tightening will squeeze the integrated silicone too much and block the flow!!!
3. Use sanitized tongs or tool to fish the silicone tube out of the keg to connect its end to the tail of the float. Try to keep the tail in the float as you connect it to the silicone tube.
I made a
H
OO
K
it
tool with stainless steel 3/32" welding rod for this and you can do the same (see photo above).
4. Drop the the connected float back inside the keg.
5. Reinstall the liquid post tightly on the keg’s nipple.
About my funky
H
OO
K
it
tool
, I include it for free to the first 100 orders. It's really a cool tool. You can hook the tube, slide it toward the free end and twist the tool counterclockwise to grip it and pull it out of the keg. I think it's
ingenious, but please tell me how you like it.


